CannyLab User Interface
- First time setup
- Main window
- Menu bar
- Toolbars
- Workspace
- Status bar
- Function block panel
- Diagram properties
- Function block search by ordinal number
- Text search
- Application settings
- Controller selection
- Hotkeys
- Error and Warning messages
First time setup
When you first launch CannyLab 2.0 or newer, you are presented with a language selection dialog:

If an earlier version of CannyLab was used, you will instead see a settings import dialog:

After the main window is launched, you will see a “Release notes” modal window (a window that needs to be closed in order to access the rest of the program), containing information about changes and additions in this version of CannyLab:

Note: You can also call this window by selecting Help -> Release notes in the menu bar.
Finally, you will see a controller selection window. Different controllers have different registers and overall capabilities, so this is important if you want your diagrams to work correctly. New file.
Main window

The main window is divided into the following sections:
- title bar;
- menu bar;
- toolbars;
- function block panel;
- workspace;
- status bar.
Depending on the current operating mode of the editor, some menu items and panels may be hidden or unavailable.
Menu bar
File menu

File menu contains options for working with CannyLab files.
| Option | Hotkey | Description |
|---|---|---|
| Create | Ctrl+N | Creates a new function diagram file |
| Open | Ctrl+O | Opens an existing function diagram file |
| Save | Ctrl+S | Saves the current function diagram file |
| Save as… | Saves the current function diagram file under a new name | |
| Save screenshot | Saves a screenshot image of the diagram in PNG format | |
| Properties | View properties of the currently open diagram | |
| test.cfd (example) | Recently opened file history(up to 5 entries) | |
| Exit | Exits the program |
Edit menu

Edit menu contains options for editing and searching function diagram elements.
| Option | Hotkey | Description |
|---|---|---|
| Undo | Ctrl+Z | Undo the last action when working with the diagram |
| Redo | Ctrl+Y | Redo the last action when working with the diagram |
| Cut | Ctrl+X | Cut the selected part of the diagram into the clipboard |
| Copy | Ctrl+C | Copy the selected part of the diagram into the clipboard |
| Paste | Ctrl+V | Paste the part of the diagram currently contained in the clipboard |
| Delete | Del | Deletes the selected part of the diagram |
| Find… | Ctrl+F | Find an element that matches the provided text search criteria |
| Find next | F3 | Find the next element that matches the criteria |
| Find previous | Shift+F3 | Find the previous element that matches the criteria |
| Find block… | Find function block by its block number | |
| Select all | Ctrl+A | Selects the entire diagram |
View menu
View menu contains options for customizing the appearance of the toolbars, the function block panel and the workspace.

| Option | Hotkey | Description |
|---|---|---|
| View All | Scale the function diagram so it fits in the avaiable workspace in its entirety | |
| Default zoom | Set workspace zoom to its default setting | |
| Lock toolbar | Toggle the ability to move toolbars around the Toolbars area. | |
| Customize toolbars | Open the “Editor toolbar visibility” window | |
| Function blocks panel | Customize function block panel display options |
Toggle checkboxes in the «Editor toolbar visibility» window to enable/disable various editor toolbars or their elements.


Note: Lock Toolbar and Customize toolbars options are also available via the context menu when right clicking the toolbar.
| Option | Description |
|---|---|
| List | View the function block panel in list mode |
| Icons | View the function block panel in list mode |
| Small … Extra Large |
Set function block panel icon size |
Note: Function block panel appearance options are also available via the context menu when right clicking the function block panel.

Device menu
Device menu contains options for working with hardware.

| Option | Description |
|---|---|
| Connect | Look for and connect to a controller connected via USB |
| Firmware | Options for uploading and erasing controller firmware |
| Diagram | Options for uploading and erasing the function diagram |
| Information | Information about the connected controller |
| Run | Start the process of executing the function diagram, if this functionality is supported by the controller. The connection between CannyLab and the controller will be terminated |
| Disconnect | Terminate the connection |
| Option | Description |
|---|---|
| Write | Upload firmware into the controller |
| Erase | Erase firmware from the controller, if present |
| Option | Description |
|---|---|
| Write | Upload the function diagram into the controller |
| Erase | Erases the function diagram from the controller, if present |
You can set the default option for writing/erasing both the firmware and the function diagram in the respective dialogs. Tick the “Do not ask” checkbox and select the desired option.

Note: This works for other windows with the «Do not ask me again» checkbox.
Simulator menu
Simulator menu contains options used in the software simulation mode.

| Option | Description |
|---|---|
| Turn on | Toggle simulator mode |
| Run | Start/pause/continue the execution of the function diagram |
| Step into | Execute the active function block. If the block is a “Composite block”, enter its internal function diagram |
| Step over | Execute the active function block. If the block is a “Composite block”, execute it in its entirety without entering its internal function diagram |
| Full loop | Execute a full function diagram loop up until either the active block or a breakpoint |
| Reset | Stop and reset the simulator mode to its initial state |
| Realtime | Bind simulator timescale to system clock |
| Values format | Set value display format in simulator mode |
| Option | Description |
|---|---|
| Dec | Use the decimal number system |
| Hex | Use the hexadecimal number system |
| Bin | Use the binary number system |
| Chr | Displays data mapped to ASCII characters |
Tools menu
Tools menu contains service options and CannyLab settings

| Option | Hotkey | Description |
|---|---|---|
| Renumber blocks | Renumber blocks on the diagram by order of execution | |
| Sheet size | Call a dialog that lets you define workspace area (in pixels) | |
| Adjust size | Set sheet size to to minimum size size that fits the entire function diagram | |
| Create SFX | Call the SFX file creation wizard | |
| CAN/LIN монитор | F9 | Launch Canny CAN/LIN monitor program |
| Diagram checkbox | Check diagram for errors and conformity to CFD language standards | |
| Restore default settings | Restore all CannyLab settings to their default values | |
| Language | Select CannyLab display language | |
| Settings… | Call the CannyLab settings window |
Set the preferred display language in the Tools -> Language sub-menu.

Note: The checkmark denotes the currently selected language.
| Option | Description |
|---|---|
| English | Select the English language |
| Русский | Select the Russian language |
To reset CannyLab settings to default select the Restore default settings option in the Tools menu, then confirm your selection in the new dialog box:

Help menu
Help menu contains links to this documentation, as well as information about the program.

| Option | Hotkey | Description |
|---|---|---|
| Release notes | View the release notes for the latest version of CannyLab | |
| User manual | F1 | Open this documentation |
| About Canny 5.3 pico | Open a PDF file with general information on this controller’s firmware | |
| About CANNY 7 | Open a PDF file with general information on this controller’s firmware | |
| About CANNY 7.2 duo | Open a PDF file with general information on this controller’s firmware | |
| End User License Agreement | Open the End User License Agreement | |
| Check for updates | Check for CannyLab updates | |
| About | Display information about the current CannyLab version | |
| About QT | Display information about the current QT version |
Toolbars
Toolbars are used for quick access to the most frequently used CannyLab options.

Desktop Control Panel allows scaling the area of the workspace and changing its dimensions in pixels. To quickly zoom in/out, rotate the mouse wheel while holding down the «Ctrl» button on your keyboard.
Workspace
The workspace is designed to display, edit, and debug function diagrams. The background of the workspace is a grid that facilitates positioning of function diagram elements. To move around the diagram displayed in the workspace, use the vertical and horizontal scroll bars, mouse wheel or arrow keys.

Status bar
The status bar displays:
- the controller for which the current function diagram is designed;
- the status of communication with the controller;
- the presence of system software and function diagram in the connected controller;
- information about controller resources used by the diagram (simulator mode only).

If you hover your mouse cursor over the status bar, you will see a tooltip.

In simulator mode the status bar displays information about the controller resources used by the diagram.

Function block panel
Function block panel contains all block types available for constructing the function diagram. Function blocks in this panel are grouped by their purpose and, depending on display setting, may be presented as either icons or a list. Scroll the function block panel by using the vertical scroll bar or your mouse wheel.
Function block panel display modes:

Diagram properties dialog
Read the properties of the current function diagram by selecting the File -> Properties menu option.
The newly open dialog will display the controller the diagram was developed for, along with the number of function blocks present on the diagram.

Function block search by ordinal number
Access the dialog for searching function blocks by their ordinal number by selecting the Edit → Find block option in the CannyLab menu bar.

Text search dialog
Access the dialog that allows searching by the specified text fragment by choosing “Edit” → “Find…” in the menu bar or by using the Ctrl + F key combination.

If you’ve already used text search in the current session, you can continue searching for the currently entered text fragment by choosing “Edit” → “Find next”/pressing “F3” to find the next occurrence or by choosing “Edit” → “Find previous”/pressing “Shift+F3” to find the previous occurrence.
Beginning with version 2.0 of CannyLab, the text search dialog window has search history, accessible by clicking the drop-down.

You will see the following message if no object matches the entered text fragment:

Application settings
Access the CannyLab settings window by selecting “Tools” → “Settings” in the menu bar.

| Option | Description |
|---|---|
| Checking for updates | Select how frequently CannyLab should check for new version releases 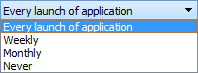 |
| Selected Net color | Define the color of a selected network |
| Associate a *.cfd file type with CannyLab | Associate the .cfd Function diagram file type with this particular install of CannyLab |
| Default diagram width | Default workspace width (in pixels) for a new file |
| Default diagram height | Default workspace height(in pixels) for a new file |
| Default diagram zoom | Default diagram zoom percentage for a new file |
| Auto adjust zoom on diagram | When enabled attempt to adjust zoom in such a way as to display the entire opening diagram in the workspace every time you open a .cfd file |
| Port to connect device | Select a COM port for connecting devices that use the RS-232 interface for downloading software. (CANNY 5, CANNY 5 nano, CANNY 5.2, CANNY 5 Duo, CANNY 5.2 Duo) 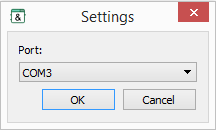 |
| Default device type | Default device type used when creating a new diagram. Select a specific controller to use it for all new diagrams or select “Ask me every time” to show the “New file” dialog that allows you to select a controller type for new diagrams individually |
| Diagram optimization when writing to a device | Toggle optimization of diagram code upon uploading it to the device |
| Prompt for confirmation when overwriting firmware | Display a confirmation dialog when attempting to write firmware to a controller that already has firmware installed |
| Prompt for confirmation when overwriting diagram | Display a confirmation dialog when attempting to upload a diagram to a controller that already has firmware installed |
| Prompt for confirmation when erasing firmware | Display a confirmation dialog when attempting to erase firmware from the controller |
| Prompt for confirmation when erasing diagram | Display a confirmation dialog when attempting to erase a diagram from the controller |
Note: You might need to run CannyLab as administrator for the settings to properly save.
Controller selection window
When you first launch CannyLab version 2 or later, or when the setting Default Device Type is set to Ask me every time, you will be presented with a New file window. You will then be able to select the device type you will be developing for.
If you tick the Remember my choice checkbox and then select a device, this window will no longer appear, the Default Device Type option will be set to the selected device and all new diagrams will be made for this device by default.

You can change the Default Device Type option in the settings.

Hotkeys
| Hotkey | Description |
|---|---|
| F1 | Open the user manual |
| Ctrl+N | Create a new function diagram file |
| Ctrl+O | Open a function diagram file |
| Ctrl+S | Save the current function diagram |
| Ctrl+A | Select the entire function diagram |
| Ctrl+Z | Undo the last action while working on the diagram |
| Ctrl+Y | Redo the last action while working on the diagram |
| Del | Delete all selected diagram elements |
| Esc | Exit the network editing mode |
| Left, Up, Right, Down | Moves the workspace viewport left, up, right, down |
| PageUp, PageDown | Moves the workspace viewport one page up or down |
| Ctrl + scroll wheel | Quickly zoom in/out on/of the workspace |
| Alt + scroll wheel | Horizontall scrolling for the workspace |
| Shift + scroll wheel | Accelerated vertical scrolling for the workspace |
| Hold scroll wheel + move the mouse | Move around the workspace by dragging the mouse |
| LMB double click | In editor mode:on a network – open the rename network dialog; on a register – open the register editor dialog; on a constant – open the constant editor dialog with the last used option selected by default. In simulator mode: on a network –set/remove control point; on a function block – set/remove the breakpoint. |
| Ctrl + LMB double click | In editor mode: on a constant – open the alternative constant editor dialog. In simulator mode: on a network – forcibly set the network value to “1”/remove the previously set value. |
Error and warning messages
Error messages
The diagram is checked for errors and warnings in the following cases: - manually by selecting the menu bar option Tools -> Diagram Check; - automatically when simulator mode is activated; - automatically when attempting to upload the diagram to the controller via Device -> Diagram -> Write; - automatically whenever the function diagram is saved.
If any errors are detected in the diagram, you are presented with an error message.

The status bar will also contain a notification about the presence of an error:

If you hover your mouse cursor over the error notification, you will get a tooltip containing the last error message received.

In case certain common errors are detected, you will be presented with a special tool to aid you in resolving those errors. For example, if two Composite Blocks have the same name, but different internal diagram contents, you will be shown a “Block conflict” window, containing highlighted differences between the internal function diagrams:

When all errors are resolved and the diagram successfully passes the diagram check without encountering an error, the status bar notification is hidden.
Error message when saving a file
If an error is found when you are saving a function diagram, you will be presented with a modified error message that allows you to cancel the saving process:

Warnings
Unlike errors, warnings let you simulate the diagram or upload it to the controller. They exist to instill best practices for diagram development. You should resolve the warning even though it lets you simulate/upload the diagram, as it could cause problems down the line.

The status bar will also contain a notification about the presence of a warning:

If you hover your mouse cursor over the warning notification, you will get a tooltip containing the last warning message received.

When all errors are resolved and the diagram successfully passes the diagram check without encountering a warning, the status bar notification is hidden.
